Build a Hello World DApp and interact with it on Rococo Contract Testnet

In the previous post, we built our first "Hello World" smart contract with ink!. Now, we're taking that creation out into the world and deploying it on the Rococo Contract Testnet, marking an exciting step towards bringing our ideas to life.
Get ready to witness your DApp come alive on a real blockchain network! Let's dive into the deployment process and experience the power of ink!.
Prerequisites
Before we start, make sure you have the following prerequisites:
-
A Polkadot.js browser extension installed on your browser. If you haven't installed it yet, you can find it here or you can use Subwallet extension instead. In this tutorial, I will use the Subwallet extension.
-
A GitHub account to clone the
Hello World Contractrepository from here -
A code editor to modify the contract code. I will use Visual Studio Code in this tutorial.
-
Because this tutorial use Next.js to build the front-end, you need to fimiliar with React.js and Next.js. If you are not fimiliar with React.js and Next.js, you can learn it here and here.
Connect to Rococo Testnet
Rococo is a testnet on Polkadot and Kusama. Utilizing the pallet-contract, Rococo allows the deployment and interaction with contracts written in ink!, providing an ideal testing ground before launching on the main networks.
Add Rococo Contract Network to Subwallet
First, we need to connect to the Rococo Testnet. Open the Subwallet extension and click on the top left menu, then select Manage Networks. Click on + button on the top right corner to add a new network.
Fill in the following information:
Network Name: Rococo
Provider URL: wss://rococo-contracts-rpc.polkadot.io
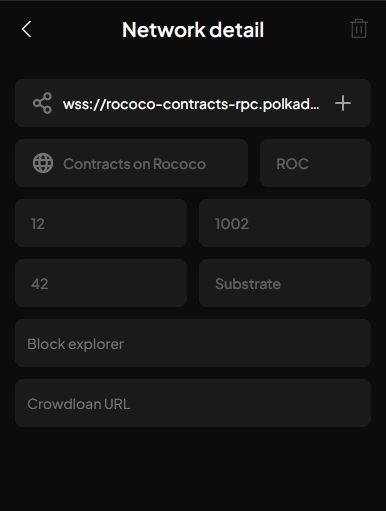
Click Save to save the network. Now, you can select the Rococo network from the network list.

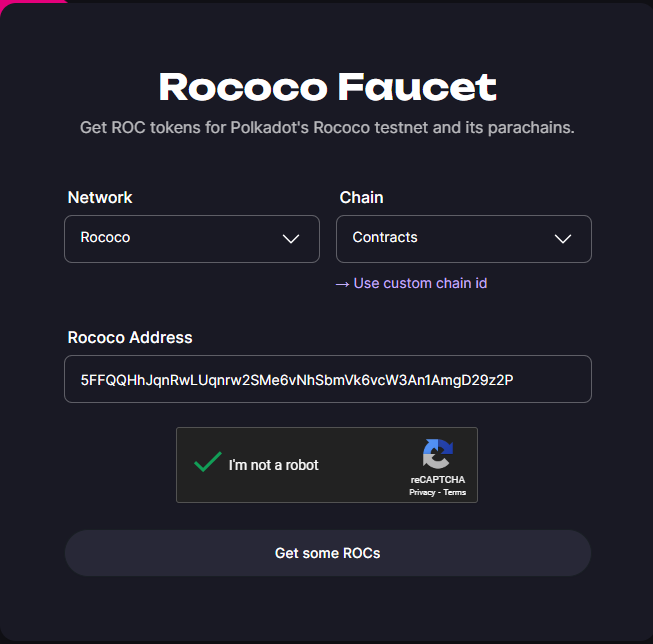
Get Testnet Tokens
To deploy the contract, you need some testnet tokens. You can get the testnet tokens from the Rococo Faucet.
At the Rococo Faucet page, select the Rococo network and Chain Contracts. Fill in your Rococo address and click on the Get some ROCs button to get the testnet tokens.
Deploy the Contract
Clone and build the contract
Clone the Hello World Contract repository from here and navigate to the project folder.
git clone https://github.com/HongThaiPham/polkadot-ink-hello-world-contract.git

cd polkadot-ink-hello-world-contract
Build the contract by running the following command:
cargo contract build
Deploy contract
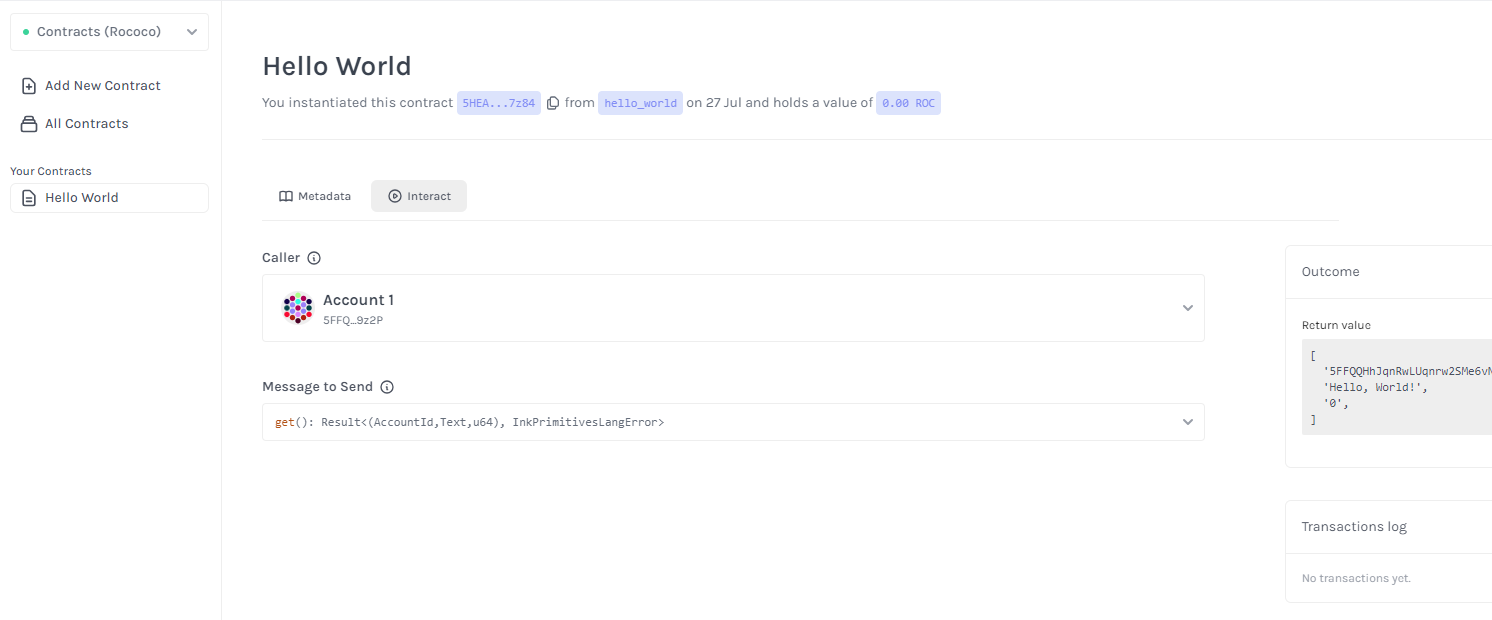
After building the contract, you will see the contract file in the target/ink folder. Now, you can deploy the contract using the ink! smart contract UI.
Open your browser and navigate to ink! smart contract UI. At the top left corner, change the network to Contracts (Rococo).
Follow this tutorial to deploy the contract using the ink! smart contract UI: Deploy a Contract.
After deploying the contract, you will get the contract address. Save the contract address for the next step.
Build the Frontend
Now, we will build the frontend to interact with the deployed contract. While we could leverage pre-built solutions like the ink!athon Boilerplate to quickly set up a frontend for our DApp, this tutorial takes a "build-from-scratch" approach using Next.js. This allows us to understand the underlying mechanics and gain greater flexibility in customizing our frontend.
This approach provides a deeper understanding of integrating blockchain components into web applications, proving particularly beneficial for learning and development purposes.
In a real-world scenario, consider using boilerplates or frameworks like ink!athon to streamline the development process.
Next.js, a popular React framework, provides an excellent foundation for building interactive and performant web applications.
Init a new Next.js project by running the following command:
npx create-next-app@latest ink-hello-world-dapp
Install dependencies
To interact with the contract, we need to install the @scio-labs/use-inkathon package. This library provides typesafe React hooks and utility functions that simplify the process of working with Substrate-based networks and ink! smart contracts.
Install the @scio-labs/use-inkathon package by running the following command:
pnpm add @scio-labs/use-inkathon
# or
npm install @scio-labs/use-inkathon
# or
yarn add @scio-labs/use-inkathon
Thank to @scio-labs, that is all you need to do to interact with the ink! smart contract.
Create .env file
Create a .env file in the root folder of the project and add the following environment variables:
NEXT_PUBLIC_DEFAULT_CHAIN=contracts
NEXT_PUBLIC_CONTRACT_ADDRESS=5HEAZNvi8CDYeqRAaNro6vsQRUNxXzaakW5fP2RmZECA7z84
NEXT_PUBLIC_CONTRACT_ID=hello_world
With NEXT_PUBLIC_DEFAULT_CHAIN is the default chain, the value contracts mean Contract Rococo network. NEXT_PUBLIC_CONTRACT_ADDRESS is the contract address what you get from the previous step. NEXT_PUBLIC_CONTRACT_ID is the contract name. Replace the value with your contract address and contract name.
How to connect your Dapp to network
To connect to network, we will create a provider to wrap our application with UseInkathonProvider from @scio-labs/use-inkathon.
"use client";
import React, { PropsWithChildren } from "react";
import {
  contracts,
  SubstrateDeployment,
  UseInkathonProvider,
} from "@scio-labs/use-inkathon";

import metadata from "@/artifacts/hello_world.json";
import { Toaster } from "./ui/sonner";
import { QueryClient, QueryClientProvider } from "@tanstack/react-query";
const queryClient = new QueryClient();

const AppProvider: React.FC<PropsWithChildren> = ({ children }) => {
  async function getContract(): Promise<SubstrateDeployment[]> {
    return [
      {
        contractId: process.env.NEXT_PUBLIC_CONTRACT_ID as string,
        networkId: contracts.network,
        abi: metadata,
        address: process.env.NEXT_PUBLIC_CONTRACT_ADDRESS as string,
      },
    ];
  }
  return (
    <QueryClientProvider client={queryClient}>
      <UseInkathonProvider
        appName="Hello World, ink!"
        connectOnInit={true}
        defaultChain={process.env.NEXT_PUBLIC_DEFAULT_CHAIN as string}
        deployments={getContract()}
      >
        {children}
        <Toaster />
      </UseInkathonProvider>
    </QueryClientProvider>
  );
};

export default AppProvider;
In the above code, we create a provider to wrap our application with UseInkathonProvider from @scio-labs/use-inkathon. We also create a getContract function to get the contract information. You can have multiple contracts in the getContract function. In this tutorial, we only have one contract.
At this point, we need to copy the hello_world.json file from the target/ink folder in contract repo folder to the artifacts folder in the frontend project. This file contains the contract metadata that is used to interact with the contract.
To connect to wallet, we will create ConnectWalletButton component, what use function connect from useInkathon hook.
const {
  isConnected,
  connect,
  accounts,
  isConnecting,
  disconnect,
  activeAccount,
} = useInkathon();
Call the connect function to connect to the wallet.
const handleConnectWallet = () => {
  if (connect) connect();
};
Call the disconnect function to disconnect from the wallet.
const handleDisconnectWallet = () => {
  if (disconnect) disconnect();
};
You can use the isConnected variable to check if the wallet is connected.
if (!isConnected) {
  return <Button onClick={handleConnectWallet}>Connect wallet</Button>;
}
The accounts variable contains the list of accounts that are connected. The activeAccount variable tells you which account is active to interact with the contract.
Query contract state
To query the contract state, we will use the contractQuery from @scio-labs/use-inkathon.
import {
  contractQuery,
  decodeOutput,
  useInkathon,
  useRegisteredContract,
} from "@scio-labs/use-inkathon";

import {
  contractQuery,
  decodeOutput,
  useInkathon,
  useRegisteredContract,
} from "@scio-labs/use-inkathon";
import { useQuery } from "@tanstack/react-query";
import { toast } from "sonner";

const useHelloWorldState = () => {
  const { api } = useInkathon();
  const contractId = process.env.NEXT_PUBLIC_CONTRACT_ID as string;

  const { contract } = useRegisteredContract(contractId);
  return useQuery({
    queryKey: ["get-hello-world-state"],
    queryFn: async () => {
      if (!contract || !api) return;
      const result = await contractQuery(api, "", contract, "get");
      const { output, isError, decodedOutput } = decodeOutput(
        result,
        contract,
        "get"
      );
      if (isError) {
        toast.error("Error fetching contract state");
        return;
      }
      return output;
    },
    enabled: !!contract && !!api,
  });
};

export default useHelloWorldState;
In the above code, we create a custom hook useHelloWorldState to query the contract state.
The first step because you have registered the contract when setting up the provider, you can get the contract instance through the useRegisteredContract hook by passing the contract id.
const { contract } = useRegisteredContract(contractId);
Next, we use the contractQuery. The contractQuery function takes the following parameters:
api: The Substrate API instance.address: The account to use for the query. For contract query, you can leave it empty.contract: The contract instance.method: The contract method to call. In this case, we call thegetmethod to get the contract state.
const result = await contractQuery(api, "", contract, "get");
Now, we have the response from the contract query. We can decode the output using the decodeOutput function.
const { output, isError, decodedOutput } = decodeOutput(
  result,
  contract,
  "get"
);
decodedOutput takes the encoded responce from the contract and the contract instance to decode the output.
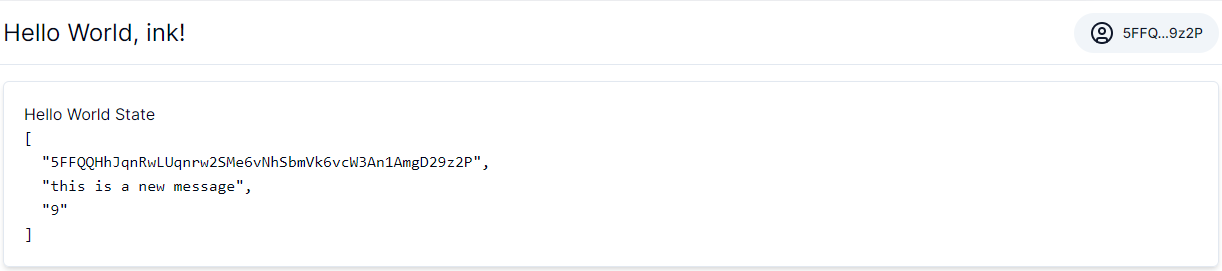
Finally, we can display the decoded ouput to the user.
Call contract method to mutate the state
To call the contract method to mutate the state, we will use the contractTx from @scio-labs/use-inkathon.
import {
  contractTx,
  useInkathon,
  useRegisteredContract,
} from "@scio-labs/use-inkathon";
import { useMutation, useQueryClient } from "@tanstack/react-query";
import { toast } from "sonner";

const useSetHelloWorldState = () => {
  const queryClient = useQueryClient();
  const { api, activeAccount } = useInkathon();
  const contractId = process.env.NEXT_PUBLIC_CONTRACT_ID as string;

  const { contract } = useRegisteredContract(contractId);
  return useMutation({
    mutationKey: ["set-hello-world-state"],
    mutationFn: async (message: string) => {
      if (!contract || !api || !activeAccount) return;
      return toast.promise(
        contractTx(api, activeAccount.address, contract, "set", {}, [message]),
        {
          loading: "Setting contract state...",
          success: async () => {
            await queryClient.invalidateQueries({
              queryKey: ["get-hello-world-state"],
            });
            return "Successfully set contract state";
          },
          error: "Error setting contract state",
        }
      );
    },
  });
};

export default useSetHelloWorldState;
In the above code, we create a custom hook useSetHelloWorldState to mutate the state.
We need to get the contract instance that we want to call by using the useRegisteredContract hook and passing the contract id.
Get the active account information through the activeAccount variable.
Next, use the contractTx function to call the contract method. The contractTx function takes the following parameters:
api: The Substrate API instance.address: The account to use for the transaction. That is the active account.contract: The contract instance.method: The contract method to call. In this case, we call thesetmethod to set the contract state.options: The options for the transaction. You can customgasLimitorstorageDepositLimithere. In this case, we don't need to custom the options.params: The parameters for the method. They passed as an array follow the order of the method parameters. In this case, we just pass a array with one element is themessage.
contractTx(api, activeAccount.address, contract, "set", {}, [message]),
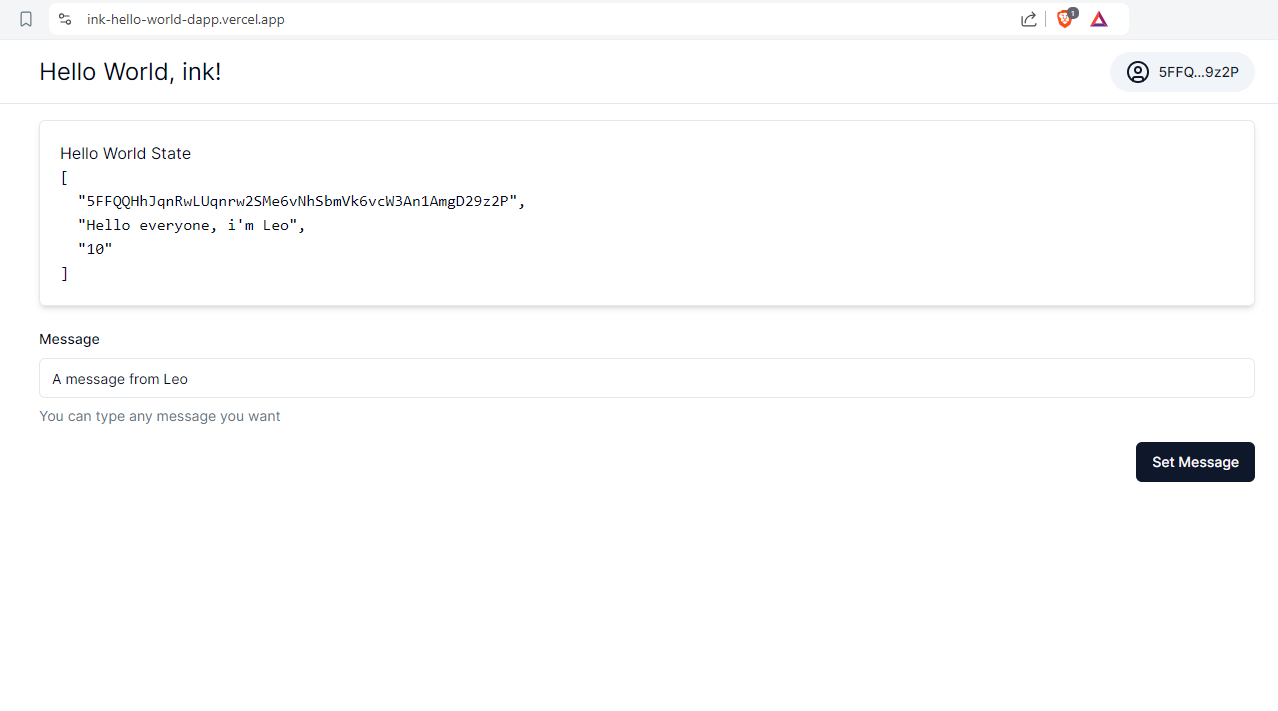
Demo video
You can watch the demo video to see how the DApp works.
Conclusion
Congratulations! You have successfully built a Hello World DApp and interacted with it on the Rococo Contract Testnet using ink! smart contract. This tutorial has provided a comprehensive guide to deploying a smart contract and building a frontend to interact with it.
You can find the full source code of the project on GitHub